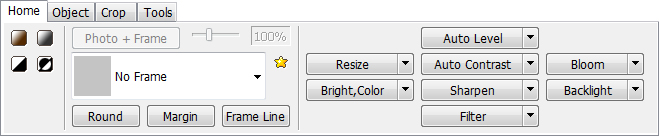
Home Tab
The home tab is in the bottom tool bar. It allows you to add frames, adjust the size and change the tones of your pictures.
Change the Tone
1. Select one of the four tones located directly under the “Home” Tab.


Original

Sepia Creates an “old-fashioned” effect by changing your picture to a reddish brown tone

Grayscale Eliminates hue to create a black and white tone picture

Threshold Changes a color picture to a black and white silhouette

Invert Negative Reverses the colors of the pictures
Note: All of the tones are preset except for the BW Threshold, which allows you to adjust the how many of the colors in the picture changes to black or white.


Frame
1. Click on the dropdown menu directly beneath the “Home” Tab.
2. Select a frame from the menu.

Combine a Frame and a Picture
1. Select a frame from the dropdown menu.
2. Click on the Photo+Frame button directly above the dropdown menu.

3. The picture and the frame are now combined into one image.
![]()
![]()
![]()
![]()
![]()
![]()
![]()
![]()
![]()

Note: This feature is only available when you use a frame from the dropdown menu.
Frame to your Favorites
1. Click on the Star icon next to the Frame button.
2. Select Manage the Frame Favorites.
This will bring up a window.
On the left will be a list of all the available frames, on the right will be a list of your favorite frames.
3. Add a frame to your favorites by clicking first on it and then on the Add to Favorites button.

Frame from your Favorites
1. Click on the Star icon next the Frame button.
2. Select a frame from the dropdown menu.

Adjust the Size of an Added Frame
1. Adjust the bar to the left of the percentage and above the frame menu.

Edit the Photo Edge
1. Click on one of buttons underneath the Frame dropdown menu
1. The picture and the frame are now combined into one image.
Round
Rounds the corners on the picture

Margin
Change the size and appearance of the space between the picture and the edge of the canvas

Frame Line
Creates a line around the inner edge of the picture

Resize
1. Click on the Resize button located directly beneath the tabs to open the Resize window.
2. Adjust the size of your picture in pixels by entering values in the Width or Height area. Alternatively, adjust the size of your picture by moving the Ratio slider left and right.

Note: To keep the ratio between the Width and Height the same, click “Preserve aspect ratio”
Resize Quickly (Popup Menu)
1. Click on the Resize dropdown directly beneath the tabs.
2. Select an option from the Resize dropdown menu.

Resize Dropdown Options
Reduce the longer length: Reduces the longest edge of the picture to a smaller standard while maintaining aspect ratio.
Adjust the longer length: Allows you to customize the length of the longest edge while maintaining aspect ratio.
Adjust width: Allows you to customize the width while maintaining aspect ratio.
Adjust height: Allows you to customize the height while maintaining aspect ratio.
Photoscape I am extremely inspired with your writing skills and also with the structure for your blog,
답글삭제